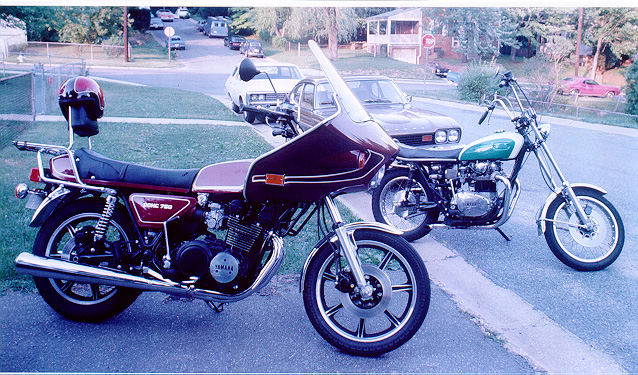
Spring 1977: The author's 1977 XS750-2D and 1972 XS2 650cc Chopper
by: Jean F. Aker
©Copyright Winding Roads Motorcycle
Times
used with permission from "Motorcycle Times".
Spring 1977:
The author's 1977 XS750-2D and 1972 XS2 650cc Chopper
In 1970, Yamaha introduced their XS-1 650cc vertical twin motorcycle. This was Yamaha’s first big bike and a stellar achievement. Soon it was regarded as the standard for its class and, to many riders, is credited, along with the CB750, with the demise of the British motorcycle industry.
Yamaha’s initial 750 class bike was a vertical twin, the TX750. It featured a single overhead cam and internal vibration dampener. Unfortunately, the TX750 had design problems and was only produced from 1973 to 1974.
Yamaha’s next foray into the 750 class was the XS750 triple. It was a technical marvel, for its day. The XS750 had: three cylinders with a 120 degree crank; three constant velocity, vacuum actuated carburetors; dual overhead cams; 5-speed transmission; triple disk brakes; solid alloy wheels; and shaft drive. It was intended to be a sport/touring bike and Yamaha offered options of: 2 fairings, luggage rack, hard shell saddle bags, and engine guards. Several XS750s were modified for racing and did fairly well. While decent at flat tracking, the 750 triple really shined in the drag racing circuit, in fact, a triple ridden by Sol Virgil, who works for Yamaha, held a track record for its class for several years. The 750cc version was produced from 1976 until 1979. For the 1980 model, the displacement was increased to 850cc, and was produced until 1982. The XS-11, 1100cc, 4 cylinder model was introduced by Yamaha in 1978 and, with the SR500 single, gave Yamaha the distinction of offering 1, 2, 3, and 4-cylinder motorcycles from 1978 until 1982.
In 1975, I got my first look at the XS750 triple and knew I had to have one. The initial model XS750 had an all silver paint job on the tank, side covers, and seat tail piece, along with a natural aluminum engine. A mid-year updated version, the XS750D, sported silver paint with navy blue insets on the tank, a black engine with polished side covers, and a 3 into 1 exhaust system. In 1977, Yamaha released the XS750-2D. It came in two-tone burgundy, "Yamaha Maxi Maroon", with gold trim, the colors of the Washington Redskins. The engine was all black with polished aluminum side covers and fins. Its solid alloy wheels were black with polished highlights. The exhaust system was a chromed 3 into 2 affair with the middle exhaust pipe connected to a collector on the right outside exhaust and into the right muffler. The 1978 XS750E was red, and featured an electronic ignition system and hotter cams, and was also released as a Special edition in black. The 1979, the XS-750F basic model was available in burgundy or black , and the Special edition was available in black, blue, or red.
The next morning, I went out to survey the damage and noticed the bike standing in a puddle of oil. The entire rear wheel and fender were covered with oil, with a trail extending to the gate. Opening the gate, I noticed the oil trail continued to the street and as far as I could see up the road. I borrowed my neighbors Sportster and tracked the oil trail to its source. A few yards before the light, there was a large oil slick on the road. I knew then that something catastrophic had occurred so I returned to the bike to see what it was.
I added a quart of fresh oil, put a pan under the bike, and started it up. The engine still made a sickening clattering noise and oil poured from the left side of the engine. I couldn’t see exactly where it was coming from - the engine case was in the way - so I cut the engine and got out my trusty tools. Removal of the left engine side cover revealed the source of the oil leak.
The clutch mechanism is on the left engine case and uses a pushrod that goes through the engine and engages with the clutch hub on the opposite side of the engine. Where the pushrod enters the engine is an oil seal, about 1" in diameter, and this was the culprit. Somehow this seal had rotated in its seat and allowed the oil to gush out. I reset the seal into its seat and added enough oil to fill the crankcase. I restarted the engine and the clattering noise seemed to be coming from the top end. I imagined that a cam or valve had failed, but at least the oil leak was fixed. I took the bike to my local shop for a mechanics opinion and was informed that bottom end was shot and would cost more to fix than the bike was worth. I rode my beloved 750 home with great care and sadness. It only had 23,000 miles on the odometer and seemed destined to end up in a salvage yard.
The oil was drained and I removed everything that prevented me from getting the engine out of the frame. I kept each subassembly together, with their respective fasteners, in shoe boxes and plastic containers. The carb bank and exhaust system were first, followed by the drive shaft and front engine mounts. Both engine side cases were removed and I could see how watch-like this machine is. On the right side of the engine, I had to get the alternator rotor and stator, clutch, and primary drive chain off. The clutch is held in place by a large nut with a lock washer. I didn’t have a socket big enough so I borrowed a plumbers faucet socket set from my cousin. That did the trick and I removed the entire clutch assembly.
On the left side, I removed the ignition points, point cam, advance unit, and clutch pushrod. Next I removed the cam cover on top of the engine and slowly rotated the crank until I located the master link on the cam chain. Once the master link was free, the cam chain was removed, as were the cams. So far, everything looked fine with no obvious signs of wear, or failure. Next went the top end and the barrels, revealing the pistons and con rods. When I pulled on the number one piston, I knew I had found the problem. There was a considerable amount of vertical play and this was not a good sign. I couldn’t wait to get the cases split to find out how bad the damage was and exactly what had failed.
I cleared my dining room table and put down a pad and some thin plywood sheets and newspapers. I pulled the engine from the frame, muscled it into the house, and set it on two 18" lengths of 4 x 4 wooden fence posts on the table. Next I removed the oil pan and oil pump from beneath the engine. I got a piece of cardboard and punched a hole in it for each case bolt. I numbered each hole to correspond to a particular case bolt and removed the bolts, all 23 of them, in the recommended order. When all the bolts were out, I gently tapped on the upper case with a rubber mallet and the cases separated easily. There before me was the main crankshaft, with the pistons hanging from their con rods, and the transmission. All three pistons had some play in them, but the number one was the worst by far. I removed the wrist pin circlips, and then the wrist pins and pistons. By then, I was sure that it was definitely the bottom end of the con rods which had failed, at least. When I disassembled the con rod connectors, I found that the con rod plain bearings had actually fused to the crankshaft journals and could only be removed by prying them off with a screwdriver. With the bearings fused to the journals, and the engine running, the bearing seats on the con rods were abraded and deformed until the were no longer perfectly round; they were now oval shaped. I theorized that the engine restarted, and ran, because I had only lost the oil in the bottom end and transmission when the seal opened. Oil that was still in the top end and the pump system was enough to run the engine long enough to get me home.
The crankshaft and con rods were "toast" and had to be repaired, or replaced. I priced a new crankshaft from Yamaha and found out it would cost $600. I searched around and found a machine shop that would rebuild all three crankshaft journals for $100 each. Then, I found a used crankshaft with the con rods attached for $200 at a salvage yard. It was guaranteed and I had it sent to the shop where the work would be done.
I knew of only one person who had the knowledge required to rebuild my XS750, and that is Bob Ernest at Heyser Cycles in Laurel, MD. I asked him to check out the used crankshaft, con rods, main bearings, and transmission. Bob plastigauged the entire bottom end, tore down the transmission, and assured me that everything looked very good. After a couple weeks of waiting for various parts, the engine cases were finally rejoined, with a new clutch pushrod oil seal bonded into its seat, and ready to go back into the frame. While waiting for Bob to finish with the bottom end, I collected most of the replacement parts needed to complete the rebuild. Every component was examined closely for excessive wear before reassembly.
The bike had been out of production for so long that very few Yamaha parts were available. The most amazing find I made, aside from the used crankshaft assembly, was locating an original rebuild gasket set for only $90. Yamaha sells each gasket separately and the head compression gasket alone is $60.
I decided to repaint the engine and polish the side covers. After the paint cured, I reinstalled all 23 case bolts in order and torqued them to spec. I reinstalled the oil pump and the oil pan. With the engine remounted into the frame, I continued the process of reassembly. The only step about which I had misgivings was setting the cam chain.
The number one piston had to be at top dead center and both cams had to be set by aligning small marks on their ends. The cam chain tensioner had to be adjusted correctly and everything was supposed to be properly timed. However, I noticed that when this was done there was a slight misadjustment. When the cam alignment marks were in the correct position the number one cylinder was no longer at top dead center. I tried moving each component one tooth to see if that helped; it didn’t. I got it as aligned as I could and crimped the new master link into place.
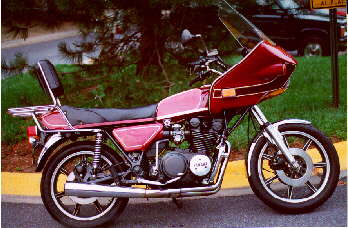
Summer 1996: The XS750 after restoration, but
with the Jardine 3 into 1 exhaust
The stock exhaust system had only lasted a couple of years. Since the bike had been garaged, I was surprised at how quickly it rusted out. I’d replaced the original 3 into 2 exhaust system with a Jardine 3 into 1. The Jardine used the stock pipes and gave me a little more power, and a much different sound. After 16 years of being riden, it was in pretty bad shape, so I had to replace the entire exhaust system and decided on a new Mac 3 into 1. It came with black pipes and a chrome muffler, and looks great with the black engine. A few days of putting it all back together, and I was ready to start the engine for the first time since it had seized. The paint work on the fairing, tank, side covers, and seat trim was very close to the stock color, but some of the pinstriping was a little creative. Even so, it looked great. The newly recovered seat and rebuilt fairing completed the project. Overall. I was very pleased with the finished bike. Aside from the missing lettering, the artistic pinstriping on the side covers, and the exhaust system, it looked like a new XS750.
The whole job took about 3 months and cost over $1,200. Much of that time was spent looking, or waiting, for parts. Considering the results, it was time and money well spent. The bike had new paint, a recovered seat, new parts everywhere, and a new lease on life. In an era when many bikes are just thrown away, I felt a sense of accomplishment at having saved the bike I love to ride from a date with a salvage yard. Now about my 1981 Yamaha XS650 twin, ....hmmm.
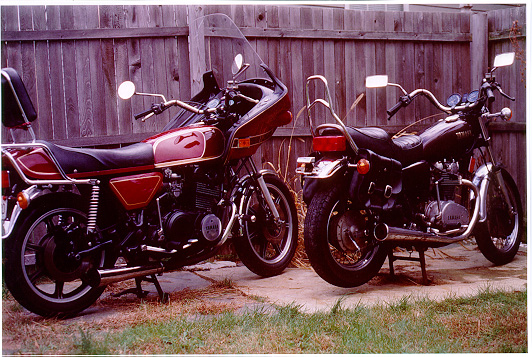
Fall 1995: The
Yamaha XS750-2D w/MAC exhaust and a 1981 XS650H